Labels

Showing posts with label Tutorials. Show all posts

Wednesday, August 6, 2014

DIY- My Signature twisted hairdo

When my hair was longer, a trademark look of mine, loved by many, was the twisted low knot. Now that my hair is much shorter and all I can do is let it loose or tie it into a low pony, I decided to find a way around to re-create the highly –requested signature look and here’s how you can too.
Before we begin, all you need to have on your dresser is a hair brush, a strong elastic headband and a few bobby pins (optional- if you've got stubborn hair).

For this hairdo- you needn’t straighten out your hair completely. Slightly wavy hair is better to achieve a great look that holds well.
Let’s get started:
1.       Brush out your hair and create a middle partition.
2.       Put on your elastic headband over the head so it sits over the hair above the nape of your neck and not under it.
3.       Start by twisting small sections of hair above the arch of your eyebrow and twist this into the headband and pull out from inside. Continue to twist sections of hair into the band- the sections can be small if you want a tighter twist or bigger if you want a loose twist. I personally prefer slightly bigger sections.
4.       Once you've finished twisting both sides until the back, you will have a fistful of hair left out. Using both hands secure all the remaining hair and twist this fully into the band. Use bobby pins to secure if needed and finish off with hairspray if you want a stronger hold to last you throughout the night.
5.       Pull out a few strands at the sides if needed, for a messier look- This goes well with dresses and bohemian styles while I would suggest keeping it tight and clean for Ethnic wear.

You can even wear this look with different headbands- floral bands, plain black ones for work or diamante bands for the night.

Simple, easy and a great do for bad hair days! Hope you guys found this tutorial helpful. Do leave comments on other tutorials you guys would like to see on the comments section below!


Pin It

Sunday, February 23, 2014

DIY: Easy Bridal Veil

 Bride on a budget? No problem! Bridal accessories can be quite expensive and what better way to cut down on costs by creating one yourself? I made my sister's bridal veil and it's no surprise that she looked stunning!
These 5 easy steps teach you how to make a bridal veil for yourself or a loved one!

 You will need:

  • 2 1/2 meters of  FINE ivory tulle. (depending on the length of the veil to suit the bride and depending on the color of the bridal gown).
  • A tiara / crown comb. I've used a comb.
  • Lace ribbon- color to match the tulle.
  • Needle, thread and scissors.
  • Sewing machine.
  • Iron on crystals and a be-dazzler (Optional)

 Start by cutting the edges of the fabric you are using into curved ends. Do this neatly and evenly. Then fold in half meter of the fabric or the desired length that will cover the bride's face.

With the fold neat and even, Use a strong white thread and run a stitch to secure the fold in place.Make sure that the loose end of the thread is knotted big so it doesn't escape through the tiny holes in the net. Pick up both layers to secure and after reaching the end, pull the fabric and gather the net and knot the gathers . The body of the veil is now ready.

TIP( TSCT Recommends): If you want some of the fabric to cover the sides of the face, instead of starting the running stitch from the ends, start only midway so that the gathers are only in the center of the fabric like so: 

You may choose to sew on the tiara to the gathers now, or you may leave it till the end. This is up to you as some find it easier to sew on the fabric to the tiara in the end.
I have already attached the gathers to the comb by hand sewing the veil in place.


The last step is to machine stitch the lace ribbon to the ends of the tulle so that the raw selvages are covered and stay hidden. I've machine stitched it because the veil I created for my sister was very long. If you want to have a shorter veil and don't know how to use the machine, you may hand sew the lace neatly.

Optional: If the tiara you have picked is very light and you want some added glam factor, you can use iron on stones and stick these on the veil, away from each other so that the stones sparkle in the light.
Make sure the tulle can withstand the heat and pressure of iron on stones before fixing them on.

P.S: Once the professional pictures of the wedding are out, I'll post one so you guys can see the veil on the bride!

Pin It

Saturday, September 7, 2013

My easy Grecian hairdo tutorial

So a lot of you have been asking me about the twisted hairdo I've been wearing lately. It's really very easy and I love working this look when my hair's just being crazy . It's also great to wear at parties and even weddings!
Before we begin, I must inform you guys that it's better to style your hair this way 1 day after a hair wash. It stays better and looks much more sleek.
So to begin, all you need is a hair brush, 2 strong bobby pins, a strong elastic and the bun maker/ donut clip.
1. Start by parting your hair in the center, just halfway to the back.
2. From one side, start twisting a small section of the hair. Make sure you keep taking smaller sections from underneath (at the hairline) and adding it into the twist. See the pictures below for a better idea.
3. Once you've twisted the hair, stop a little after the ears and secure it with a bobby pin.
4. Repeat the process on the other side.
5. Tie a pony a little up, not too high , at the nape of your neck. A low bun is always elegant.
6. After you've secured the pony, use the donut clip and make a bun. Don't know how to make the bun with this easy clip? Watch how to on my video by clicking HERE.
7. Add in a flower or any accessory if you like.
8. TIP: You can also wear a diamante elastic headband before starting the hairdo so the band peeks out at the top!

Easy peasy no? Share your thoughts below girls!


Pin It

Tuesday, April 23, 2013

Glitter Chocolate nails


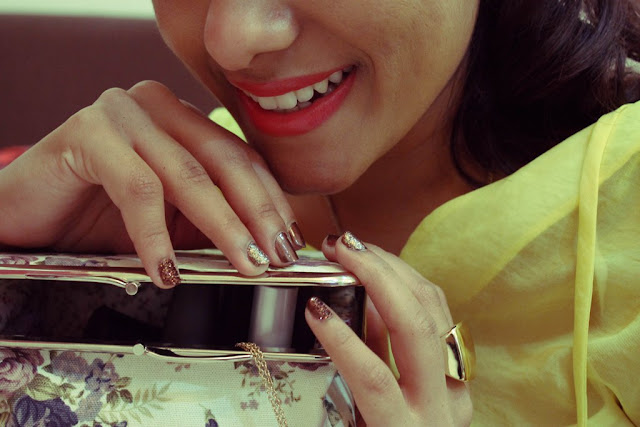
I love wearing glitter nails, but sometimes its so hard to find a good glitter nail polish that actually looks like glitter and sparkles. So I decided to use fine glitter eye shadow powder on my nails instead of polish and the results are brilliant!
Before we begin, let me point out that you will want to use very fine powder, preferably eye shadow glitter.

You will need:
Nail polish and eye shadow glitter in matching colors, or not- your call,Top coat- glossy,Q tips and a brush.,Small square paper to dust on glitter.
1. Paint your nails and let them dry. 2 coats and seal. Pick a nail youb want to use the glitter on and apply one more coat of color. Do not wait for it to dry!
2. Place your finger on the small square of paper and immediately pick up some glitter dust and dust it on the nail, ensuring all areas are covered. Press down slightly your thumb.
3.Dust off excess powder with a brush or by gently blowing on the nail. Stubbon dust can be taken off using a Q tip and some remover.
4. Do not waste the glitter powder left back on the paper, fold and drop back in the remaining dust into the glitter pot.
5. Apply top coat on all other nails except the glitter nail to give it a much more 'popped out' effect!


                                                                              Pin It

Sunday, April 14, 2013

Cat eye makeup tutorial


                                                                         Pin It

After getting so many requests via email, my Facebook page and Instagram, I've finally had the time to film my eye make up tutorial. I'm not that great at editing so hope you guys are okay with the poor quality. Hopefully my next video will be better.

Products I've used in this video:

  • Mac studio fix fluid NC 42
  • Benefit- hello flawless
  • Garnier eye roll on Medium
  • Lakme liquid liner in Black 01
  • Victorias secret mini nude eye pencil
  • Maybelline shimmer eye shadow in "Nightsky"
  • Benefit- They're real
  • Beauty Rush by VS luminous shadow in "glow nude"

Saturday, February 16, 2013

Featured in 181 youth magazine


Here is my latest magazine feature in 181's online magazine. I've been meaning to post this before I traveled to London but unfortunately, couldn't. Follow @181youth on twitter!

You can follow 181 on facebook HERE, and even read the full magazine online via the FB page.

xxoo


                                                                              Pin It

Saturday, January 19, 2013

In Sabaya Magazine's January Issue


Here's my write up on Celeb hits and misses on Sabaya Magazine's January Issue. You can read the full magazine HERE.

Photograph of me from last month's post which you can read HERE.

XXOO

                                                                                   Pin It

Monday, December 10, 2012

Rewind to November 2011, Bahrain Fashion Week


On me: Dress-Zara, Shoes-FCUK, Necklace-Aldo. On Models: All gowns: ASK Design


I never really got a chance to blog about my proudest moment. Bahrain Fashion Week 2011 was by far the best experience of my life. Ever since, my design and fashion career have only gotten better.
It all began when I was selected among many young designers from Bahrain and Saudi to showcase at the event. The next 2 weeks after my selection was crazy busy -Tailoring, dress fittings, interviews and lots of chit chat between designers. It was beautiful chaos.

After a night full of glamour, press, fun, partying and a few magazine articles, it was all over. But in my mind, the memory is still fresh. 


To look at more photographs of the event and fun behind the scene photographs, visit Francine Burlet's (an AMAZING photographer and the kindest person I came across at BFW) photo gallery HERE.

Until the next post,
XXOO